Tuesday, March 12, 2013
Picking Master Locks by The Jolly Roger
Have you ever tried to impress someone by picking one of those
Master combination locks and failed?
The Master lock company made their older combination locks with a
protection scheme. If you pull the handle too hard, the knob will
not turn. That was their biggest mistake.
The first number:
Get out any of the Master locks so you know what is going on.
While pulling on the clasp (part that springs open when you get
the combination right), turn the knob to the left until it will
not move any more, and add five to the number you reach. You now
have the first number of the combination.
The second number:
Spin the dial around a couple of times, then go to the first
number you got. Turn the dial to the right, bypassing the first
number once. When you have bypassed the first number, start
pulling on the clasp and turning the knob. The knob will
eventually fall into the groove and lock. While in the groove,
pull the clasp and turn the knob. If the knob is loose, go to the
next groove, if the knob is stiff, you have the second number of
the combination.
The third number:
After getting the second number, spin the dial, then enter the two
numbers. Slowly spin the dial to the right, and at each number,
pull on the clasp. The lock will eventually open if you did the
process right.
This method of opening Master locks only works on older models.
Someone informed Master of their mistake, and they employed a new
mechanism that is foolproof (for now).
The older models are from 1988-1990. The newer models are being
cracked on as we speak..


How Linux Booting Happens
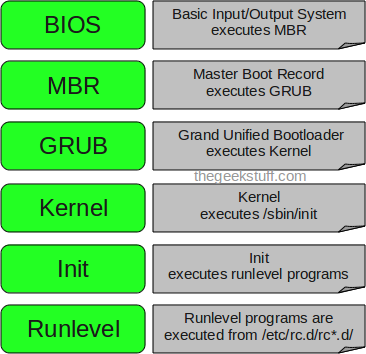
boot process:
1. A boot loader finds the kernel image on the disk, loads it into memory, and starts it.
2. The kernel initializes the devices and its drivers.
3. The kernel mounts the root filesystem.
4. The kernel starts a program called init.
5. init sets the rest of the processes in motion.
6. The last processes that init starts as part of the boot sequence allow you to log in.
Identifying each stage of the boot process is invaluable in fixing boot problems and understanding the system as a whole. To start, zero in on the boot loader, which is the initial screen or prompt you get after the computer does its power-on self-test, asking which operating system to run. After you make a choice, the boot loader runs the Linux kernel, handing control of the system to the kernel.
There is a detailed discussion of the kernel elsewhere in this book from which this article is excerpted. This article covers the kernel initialization stage, the stage when the kernel prints a bunch of messages about the hardware present on the system. The kernel starts init just after it displays a message proclaiming that the kernel has mounted the root filesystem:
VFS: Mounted root (ext2 filesystem) readonly.
Soon after, you will see a message about init starting, followed by system service startup messages, and finally you get a login prompt of some sort.
NOTE On Red Hat Linux, the init note is especially obvious, because it "welcomes" you to "Red Hat Linux." All messages thereafter show success or failure in brackets at the right-hand side of the screen.
Most of this chapter deals with init, because it is the part of the boot sequence where you have the most control.
init
There is nothing special about init. It is a program just like any other on the Linux system, and you'll find it in /sbin along with other system binaries. The main purpose of init is to start and stop other programs in a particular sequence. All you have to know is how this sequence works.
There are a few different variations, but most Linux distributions use the System V style discussed here. Some distributions use a simpler version that resembles the BSD init, but you are unlikely to encounter this.
Runlevels
At any given time on a Linux system, a certain base set of processes is running. This state of the machine is called its runlevel, and it is denoted with a number from 0 through 6. The system spends most of its time in a single runlevel. However, when you shut the machine down, init switches to a different runlevel in order to terminate the system services in an orderly fashion and to tell the kernel to stop. Yet another runlevel is for single-user mode, discussed later.
The easiest way to get a handle on runlevels is to examine the init configuration file, /etc/inittab. Look for a line like the following:
id:5:initdefault:
This line means that the default runlevel on the system is 5. All lines in the inittab file take this form, with four fields separated by colons occurring in the following order:
# A unique identifier (a short string, such as id in the preceding example)
# The applicable runlevel number(s)
# The action that init should take (in the preceding example, the action is to set the default runlevel to 5)
# A command to execute (optional)
There is no command to execute in the preceding initdefault example because a command doesn't make sense in the context of setting the default runlevel. Look a little further down in inittab, until you see a line like this:
l5:5:wait:/etc/rc.d/rc 5
This line triggers most of the system configuration and services through the rc*.d and init.d directories. You can see that init is set to execute a command called /etc/rc.d/rc 5 when in runlevel 5. The wait action tells when and how init runs the command: run rc 5 once when entering runlevel 5, and then wait for this command to finish before doing anything else.
There are several different actions in addition to initdefault and wait, especially pertaining to power management, and the inittab(5) manual page tells you all about them. The ones that you're most likely to encounter are explained in the following sections.
respawn
The respawn action causes init to run the command that follows, and if the command finishes executing, to run it again. You're likely to see something similar to this line in your inittab file:
1:2345:respawn:/sbin/mingetty tty1
The getty programs provide login prompts. The preceding line is for the first virtual console (/dev/tty1), the one you see when you press ALT-F1 or CONTROL-ALT-F1. The respawn action brings the login prompt back after you log out.
ctrlaltdel
The ctrlaltdel action controls what the system does when you press CONTROL-ALT-DELETE on a virtual console. On most systems, this is some sort of reboot command using the shutdown command.
sysinit
The sysinit action is the very first thing that init should run when it starts up, before entering any runlevels.
How processes in runlevels start
You are now ready to learn how init starts the system services, just before it lets you log in. Recall this inittab line from earlier:
l5:5:wait:/etc/rc.d/rc 5
This small line triggers many other programs. rc stands for run commands, and you will hear people refer to the commands as scripts, programs, or services. So, where are these commands, anyway?
For runlevel 5, in this example, the commands are probably either in /etc/rc.d/rc5.d or /etc/rc5.d. Runlevel 1 uses rc1.d, runlevel 2 uses rc2.d, and so on. You might find the following items in the rc5.d directory:
S10sysklogd S20ppp S99gpm
S12kerneld S25netstd_nfs S99httpd
S15netstd_init S30netstd_misc S99rmnologin
S18netbase S45pcmcia S99sshd
S20acct S89atd
S20logoutd S89cron
The rc 5 command starts programs in this runlevel directory by running the following commands:
S10sysklogd start
S12kerneld start
S15netstd_init start
S18netbase start
...
S99sshd start
Notice the start argument in each command. The S in a command name means that the command should run in start mode, and the number (00 through 99) determines where in the sequence rc starts the command.
The rc*.d commands are usually shell scripts that start programs in /sbin or /usr/sbin. Normally, you can figure out what one of the commands actually does by looking at the script with less or another pager program.
You can start one of these services by hand. For example, if you want to start the httpd Web server program manually, run S99httpd start. Similarly, if you ever need to kill one of the services when the machine is on, you can run the command in the rc*.d directory with the stop argument (S99httpd stop, for instance).
Some rc*.d directories contain commands that start with K (for "kill," or stop mode). In this case, rc runs the command with the stop argument instead of start. You are most likely to encounter K commands in runlevels that shut the system down.
Adding and removing services
If you want to add, delete, or modify services in the rc*.d directories, you need to take a closer look at the files inside. A long listing reveals a structure like this:
lrwxrwxrwx . . . S10sysklogd -> ../init.d/sysklogd
lrwxrwxrwx . . . S12kerneld -> ../init.d/kerneld
lrwxrwxrwx . . . S15netstd_init -> ../init.d/netstd_init
lrwxrwxrwx . . . S18netbase -> ../init.d/netbase
...
The commands in an rc*.d directory are actually symbolic links to files in an init.d directory, usually in /etc or /etc/rc.d. Linux distributions contain these links so that they can use the same startup scripts for all runlevels. This convention is by no means a requirement, but it often makes organization a little easier.
To prevent one of the commands in the init.d directory from running in a particular runlevel, you might think of removing the symbolic link in the appropriate rc*.d directory. This does work, but if you make a mistake and ever need to put the link back in place, you might have trouble remembering the exact name of the link. Therefore, you shouldn't remove links in the rc*.d directories, but rather, add an underscore (_) to the beginning of the link name like this:
mv S99httpd _S99httpd
At boot time, rc ignores _S99httpd because it doesn't start with S or K. Furthermore, the original name is still obvious, and you have quick access to the command if you're in a pinch and need to start it by hand.
To add a service, you must create a script like the others in the init.d directory and then make a symbolic link in the correct rc*.d directory. The easiest way to write a script is to examine the scripts already in init.d, make a copy of one that you understand, and modify the copy.
When adding a service, make sure that you choose an appropriate place in the boot sequence to start the service. If the service starts too soon, it may not work, due to a dependency on some other service. For non-essential services, most systems administrators prefer numbers in the 90s, after most of the services that came with the system.
Linux distributions usually come with a command to enable and disable services in the rc*.d directories. For example, in Debian, the command is update-rc.d, and in Red Hat Linux, the command is chkconfig. Graphical user interfaces are also available. Using these programs helps keep the startup directories consistent and helps with upgrades.
HINT: One of the most common Linux installation problems is an improperly configured XFree86 server that flicks on and off, making the system unusable on console. To stop this behavior, boot into single-user mode and alter your runlevel or runlevel services. Look for something containing xdm, gdm, or kdm in your rc*.d directories, or your /etc/inittab.
Controlling init
Occasionally, you need to give init a little kick to tell it to switch runlevels, to re-read the inittab file, or just to shut down the system. Because init is always the first process on a system, its process ID is always 1.
You can control init with telinit. For example, if you want to switch to runlevel 3, use this command:
telinit 3
When switching runlevels, init tries to kill off any processes that aren't in the inittab file for the new runlevel. Therefore, you should be careful about changing runlevels.
When you need to add or remove respawning jobs or make any other change to the inittab file, you must tell init about the change and cause it to re-read the file. Some people use kill -HUP 1 to tell init to do this. This traditional method works on most versions of Unix, as long as you type it correctly. However, you can also run this telinit command:
telinit q
You can also use telinit s to switch to single-user mode.
Shutting down
init also controls how the system shuts down and reboots. The proper way to shut down a Linux machine is to use the shutdown command.
There are two basic ways to use shutdown. If you halt the system, it shuts the machine down and keeps it down. To make the machine halt immediately, use this command:
shutdown -h now
On most modern machines with reasonably recent versions of Linux, a halt cuts the power to the machine. You can also reboot the machine. For a reboot, use -r instead of -h.
The shutdown process takes several seconds. You should never reset or power off a machine during this stage.
In the preceding example, now is the time to shut down. This argument is mandatory, but there are many ways of specifying it. If you want the machine to go down sometime in the future, one way is to use +n, where n is the number of minutes shutdown should wait before doing its work. For other options, look at the shutdown(8) manual page.
To make the system reboot in 10 minutes, run this command:
shutdown -r +10
On Linux, shutdown notifies anyone logged on that the machine is going down, but it does little real work. If you specify a time other than now, shutdown creates a file called /etc/nologin. When this file is present, the system prohibits logins by anyone except the superuser.
When system shutdown time finally arrives, shutdown tells init to switch to runlevel 0 for a halt and runlevel 6 for a reboot. When init enters runlevel 0 or 6, all of the following takes place, which you can verify by looking at the scripts inside rc0.d and rc6.d:
1. init kills every process that it can (as it would when switching to any other runlevel).
# The initial rc0.d/rc6.d commands run, locking system files into place and making other preparations for shutdown.
# The next rc0.d/rc6.d commands unmount all filesystems other than the root.
# Further rc0.d/rc6.d commands remount the root filesystem read-only.
# Still more rc0.d/rc6.d commands write all buffered data out to the filesystem with the sync program.
# The final rc0.d/rc6.d commands tell the kernel to reboot or stop with the reboot, halt, or poweroff program.
The reboot and halt programs behave differently for each runlevel, potentially causing confusion. By default, these programs call shutdown with the -r or -h options, but if the system is already at the halt or reboot runlevel, the programs tell the kernel to shut itself off immediately. If you really want to shut your machine down in a hurry (disregarding any possible damage from a disorderly shutdown), use the -f option.
how To Create One-Click Shutdown and Reboot Shortcuts
First, create a shortcut on your desktop by right-clicking on the desktop, choosing New, and then choosing Shortcut. The Create Shortcut Wizard appears. In the box asking for the location of the shortcut, type shutdown. After you create the shortcut, double-clicking on it will shut down your PC.
But you can do much more with a shutdown shortcut than merely shut down your PC. You can add any combination of several switches to do extra duty, like this:
shutdown -r -t 01 -c "Rebooting your PC"
Double-clicking on that shortcut will reboot your PC after a one-second delay and display the message "Rebooting your PC." The shutdown command includes a variety of switches you can use to customize it. Table 1-3 lists all of them and describes their use.
I use this technique to create two shutdown shortcuts on my desktop—one for turning off my PC, and one for rebooting. Here are the ones I use:
shutdown -s -t 03 -c "Bye Bye m8!"
shutdown -r -t 03 -c "Ill be back m8 ;)!"
Switch
What it does
-s
Shuts down the PC.
-l
Logs off the current user.
-t nn
Indicates the duration of delay, in seconds, before performing the action.
-c "messagetext"
Displays a message in the System Shutdown window. A maximum of 127 characters can be used. The message must be enclosed in quotation marks.
-f
Forces any running applications to shut down.
-r
Reboots the PC.
How To Create a huge file
You can create a file of any size using nothing more than what's supplied with Windows. Start by converting the desired file size into hexadecimal notation. You can use the Windows Calculator in Scientific mode do to this. Suppose you want a file of 1 million bytes. Enter 1000000 in the calculator and click on the Hex option to convert it (1 million in hex is F4240.) Pad the result with zeroes at the left until the file size reaches eight digits—000F4240.
Now open a command prompt window. In Windows 95, 98, or Me, you can do this by entering COMMAND in the Start menu's Run dialog; in Windows NT 4.0, 2000, or XP enter CMD instead. Enter the command DEBUG BIGFILE.DAT and ignore the File not found message. Type RCX and press Enter. Debug will display a colon prompt. Enter the last four digits of the hexadecimal number you calculated (4240, in our example). Type RBX and press Enter, then enter the first four digits of the hexadecimal size (000F, in our example). Enter W for Write and Q for Quit. You've just created a 1-million-byte file using Debug. Of course you can create a file of any desired size using the same technique.
FTP Error Codes And the Descripions

120 Service ready in nnn minutes.
125 Data connection already open; transfer starting.
150 File status okay; about to open data connection.
200 Command okay.
202 Command not implemented, superfluous at this site.
211 System status, or system help reply.
212 Directory status.
213 File status.
214 Help message.On how to use the server or the meaning of a particular non-standard command. This reply is useful only to the human user.
215 NAME system type. Where NAME is an official system name from the list in the Assigned Numbers document.
220 Service ready for new user.
221 Service closing control connection.
225 Data connection open; no transfer in progress.
226 Closing data connection. Requested file action successful (for example, file transfer or file abort).
227 Entering Passive Mode (h1,h2,h3,h4,p1,p2).
230 User logged in, proceed. Logged out if appropriate.
250 Requested file action okay, completed.
257 "PATHNAME" created.
331 User name okay, need password.
332 Need account for login.
350 Requested file action pending further information
421 Service not available, closing control connection.This may be a reply to any command if the service knows it must shut down.
425 Can't open data connection.
426 Connection closed; transfer aborted.
450 Requested file action not taken.
451 Requested action aborted. Local error in processing.
452 Requested action not taken. Insufficient storage space in system.File unavailable (e.g., file busy).
500 Syntax error, command unrecognized. This may include errors such as command line too long.
501 Syntax error in parameters or arguments.
502 Command not implemented.
503 Bad sequence of commands.
504 Command not implemented for that parameter.
530 Not logged in.
532 Need account for storing files.
550 Requested action not taken. File unavailable (e.g., file not found, no access).
551 Requested action aborted. Page type unknown.
552 Requested file action aborted. Exceeded storage allocation (for current directory or dataset).
553 Requested action not taken. File name not allowed.
Monday, March 11, 2013
Making Plastic Explosives from Bleach by The Jolly Roger

Potassium chlorate is an extremely volatile explosive compound,
and has been used in the past as the main explosive filler in
grenades, land mines, and mortar rounds by such countries as
France and Germany. Common household bleach contains a small
amount of potassium chlorate, which can be extracted by the
procedure that follows.
First off, you must obtain:
[1] A heat source (hot plate, stove, etc.)
[2] A hydrometer, or battery hydrometer
[3] A large Pyrex, or enameled steel container (to weigh
chemicals)
[4] Potassium chloride (sold as a salt substitute at health and
nutrition stores)
Take one gallon of bleach, place it in the container, and begin
heating it. While this solution heats, weigh out 63 grams of
potassium chloride and add this to the bleach being heated.
Constantly check the solution being heated with the hydrometer,
and boil until you get a reading of 1.3. If using a battery
hydrometer, boil until you read a FULL charge.
Take the solution and allow it to cool in a refrigerator until it
is between room temperature and 0 degrees Celcius. Filter out the
crystals that have formed and save them. Boil this solution again
and cool as before. Filter and save the crystals.
Take the crystals that have been saved, and mix them with
distilled water in the following proportions: 56 grams per 100
milliliters distilled water. Heat this solution until it boils
and allow to cool. Filter the solution and save the crystals that
form upon cooling. This process of purification is called
"fractional crystalization". These crystals should be relatively
pure potassium chlorate.
Powder these to the consistency of face powder, and heat gently to
drive off all moisture.
Now, melt five parts Vaseline with five parts wax. Dissolve this
in white gasoline (camp stove gasoline), and pour this liquid on
90 parts potassium chlorate (the powdered crystals from above)
into a plastic bowl. Knead this liquid into the potassium
chlorate until intimately mixed. Allow all gasoline to evaporate.
Finally, place this explosive into a cool, dry place. Avoid
friction, sulfur, sulfides, and phosphorous compounds. This
explosive is best molded to the desired shape and density of 1.3
grams in a cube and dipped in wax until water proof. These block
type charges guarantee the highest detonation velocity. Also, a
blasting cap of at least a 3 grade must be used.
The presence of the afore mentioned compounds (sulfur, sulfides,
etc.) results in mixtures that are or can become highly sensitive
and will possibly decompose explosively while in storage. You
should never store homemade explosives, and you must use EXTREME
caution at all times while performing the processes in this
article.
How To Change A Cmos Battery
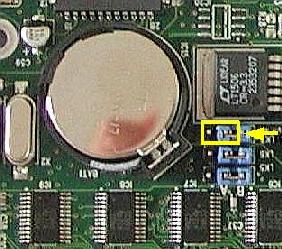
First the safety rules , The inside of a computer is a bad place full of electricity and sharp edges.
On the electricity side always when working on you computer make sure that it’s still plugged in to the power socket and the power is turned off, this is to ensure that any static From you is discharged through the earth. The inside of most computer cases are unfinished metal and has very sharp edges so be careful.
The first signs of a battery failing are:-
1) your clock starts running slowly
2) when you boot (start) your computer it has a problem finding your hardware (no hard drive, no cd rom)
To change the battery you need the following tools
1) a X-point screwdriver
2) an anti-static strap(optional)
3) a new battery (seems logical)
Then unplug all the cables from the back of the computer as you remove them make a note where they came from. (So when you finished you can put them back)
Move the computer somewhere where you can work on it with ease
Remove the cover by locating the screws around the outer edge (back) of the computer
Some computer cases only require you to remove 2 screws on one side then a panel can be removed allowing you access to the computers insides, others you must remove 6 screws and remove the whole case by sliding it to the rear and lifting it off.
Now make sure that you read the safety instructions about static.
Look inside you will see a round silver thing that looks about the size of a 10p piece (quarter). This is the battery itself, carefully lift the retaining clip and slide the battery out. That’s it removed now go to your local computer retailer, electrical retailer (Tandy/Radio shack) taking the old battery with you and get a new battery.
Back to your computer insert the new battery by lifting the clip and sliding the battery in.
Reinstall your case and plug all the cables back (you did remember to label them didn’t you)
Now for the fun part.
You will now need to go into you bios….
Right the bios is the god of your computer.
To access it, when your computer first starts you will see a black screen with white text.
If you look carefully you will see a line that says something like "press del for setup" or some other key (F2 or ESC or tab) this will take you to god's house where you can make lots of changes to the way your machine works.
It is also the place where you can make your nice computer in to a rather expensive door stop so be careful and don’t go playing with anything.
You will now be presented with a blue screen with a lot of options on it,
The one we want is load optimised/default settings.
Press the F10 key and type y the computer should now reboot.
If every thing went well then your computer will now be up and running.
Shizers way: Keep computer running. Lay it on it's side and remove side cover to expose MoBo. Take any thin object, "small screwdriver, knife point, wood shiskabob skewer. Pull back the battery retaining clip. Toss the old battery in the junk recepticle, unless you belong to greenpeace and want to save the earth. Install the new battery. No need to reset bios becasue the compter supplies voltage to the cmos while it is running. Reset or resync clock with internet. Done!
written by unknown
23 Ways To Speed WinXP

Since defragging the disk won't do much to improve Windows XP performance, here are 23 suggestions that will. Each can enhance the performance and reliability of your customers' PCs. Best of all, most of them will cost you nothing.
1.) To decrease a system's boot time and increase system performance, use the money you save by not buying defragmentation software -- the built-in Windows defragmenter works just fine -- and instead equip the computer with an Ultra-133 or Serial ATA hard drive with 8-MB cache buffer.
2.) If a PC has less than 512 MB of RAM, add more memory. This is a relatively inexpensive and easy upgrade that can dramatically improve system performance.
3.) Ensure that Windows XP is utilizing the NTFS file system. If you're not sure, here's how to check: First, double-click the My Computer icon, right-click on the C: Drive, then select Properties. Next, examine the File System type; if it says FAT32, then back-up any important data. Next, click Start, click Run, type CMD, and then click OK. At the prompt, type CONVERT C: /FS:NTFS and press the Enter key. This process may take a while; it's important that the computer be uninterrupted and virus-free. The file system used by the bootable drive will be either FAT32 or NTFS. I highly recommend NTFS for its superior security, reliability, and efficiency with larger disk drives.
4.) Disable file indexing. The indexing service extracts information from documents and other files on the hard drive and creates a "searchable keyword index." As you can imagine, this process can be quite taxing on any system.
The idea is that the user can search for a word, phrase, or property inside a document, should they have hundreds or thousands of documents and not know the file name of the document they want. Windows XP's built-in search functionality can still perform these kinds of searches without the Indexing service. It just takes longer. The OS has to open each file at the time of the request to help find what the user is looking for.
10 Fast and Free Security Enhancements
1. Check Windows Update and Office Update regularly (_http://office.microsoft.com/productupdates); have your Office CD ready. Windows Me, 2000, and XP users can configure automatic updates. Click on the Automatic Updates tab in the System control panel and choose the appropriate options.
2. Install a personal firewall. Both SyGate (_www.sygate.com) and ZoneAlarm (_www.zonelabs.com) offer free versions.
10 reasons why PCs crash you must Know
Fatal error: the system has become unstable or is busy," it says. "Enter to return to Windows or press Control-Alt-Delete to restart your computer. If you do this you will lose any unsaved information in all open applications."
You have just been struck by the Blue Screen of Death. Anyone who uses Mcft Windows will be familiar with this. What can you do? More importantly, how can you prevent it happening?
1 Hardware conflict
The number one reason why Windows crashes is hardware conflict. Each hardware device communicates to other devices through an interrupt request channel (IRQ). These are supposed to be unique for each device.
For example, a printer usually connects internally on IRQ 7. The keyboard usually uses IRQ 1 and the floppy disk drive IRQ 6. Each device will try to hog a single IRQ for itself.
If there are a lot of devices, or if they are not installed properly, two of them may end up sharing the same IRQ number. When the user tries to use both devices at the same time, a crash can happen. The way to check if your computer has a hardware conflict is through the following route:
* Start-Settings-Control Panel-System-Device Manager.
Often if a device has a problem a yellow '!' appears next to its description in the Device Manager. Highlight Computer (in the Device Manager) and press Properties to see the IRQ numbers used by your computer. If the IRQ number appears twice, two devices may be using it.
Sometimes a device might share an IRQ with something described as 'IRQ holder for PCI steering'. This can be ignored. The best way to fix this problem is to remove the problem device and reinstall it.
Sometimes you may have to find more recent drivers on the internet to make the device function properly. A good resource is www.driverguide.com. If the device is a soundcard, or a modem, it can often be fixed by moving it to a different slot on the motherboard (be careful about opening your computer, as you may void the warranty).
When working inside a computer you should switch it off, unplug the mains lead and touch an unpainted metal surface to discharge any static electricity.
To be fair to Mcft, the problem with IRQ numbers is not of its making. It is a legacy problem going back to the first PC designs using the IBM 8086 chip. Initially there were only eight IRQs. Today there are 16 IRQs in a PC. It is easy to run out of them. There are plans to increase the number of IRQs in future designs.
2 Bad Ram
Ram (random-access memory) problems might bring on the blue screen of death with a message saying Fatal Exception Error. A fatal error indicates a serious hardware problem. Sometimes it may mean a part is damaged and will need replacing.
But a fatal error caused by Ram might be caused by a mismatch of chips. For example, mixing 70-nanosecond (70ns) Ram with 60ns Ram will usually force the computer to run all the Ram at the slower speed. This will often crash the machine if the Ram is overworked.
One way around this problem is to enter the BIOS settings and increase the wait state of the Ram. This can make it more stable. Another way to troubleshoot a suspected Ram problem is to rearrange the Ram chips on the motherboard, or take some of them out. Then try to repeat the circumstances that caused the crash. When handling Ram try not to touch the gold connections, as they can be easily damaged.
Parity error messages also refer to Ram. Modern Ram chips are either parity (ECC) or non parity (non-ECC). It is best not to mix the two types, as this can be a cause of trouble.
EMM386 error messages refer to memory problems but may not be connected to bad Ram. This may be due to free memory problems often linked to old Dos-based programmes.
3 BIOS settings
Every motherboard is supplied with a range of chipset settings that are decided in the factory. A common way to access these settings is to press the F2 or delete button during the first few seconds of a boot-up.
Once inside the BIOS, great care should be taken. It is a good idea to write down on a piece of paper all the settings that appear on the screen. That way, if you change something and the computer becomes more unstable, you will know what settings to revert to.
A common BIOS error concerns the CAS latency. This refers to the Ram. Older EDO (extended data out) Ram has a CAS latency of 3. Newer SDRam has a CAS latency of 2. Setting the wrong figure can cause the Ram to lock up and freeze the computer's display.
Mcft Windows is better at allocating IRQ numbers than any BIOS. If possible set the IRQ numbers to Auto in the BIOS. This will allow Windows to allocate the IRQ numbers (make sure the BIOS setting for Plug and Play OS is switched to 'yes' to allow Windows to do this.).
Subscribe to:
Posts (Atom)
